Pi Payments
The platform API allows you to read and write data to the Pi Servers related to your app deployed on the Pi Apps platform and Pioneers using your app.
Table of contents
What are Pi Payments
Payments are wrappers around blockchain transactions, which enable your app, the Pi blockchain, and the Pi Servers to be all synchronized when the Pioneer submits a blockchain transaction to pay for something in your app.
They abstract away the technicalities involved when interacting with the Pi blockchain and enable you, the developer of the app, to have full confidence that the Pioneer has actually made the transaction.
After a payment is created, it goes through 3 major phases:
- Payment creation and Server-Side Approval
- Pioneer interaction and blockchain transaction
- Server-Side Completion
Payment Flow Diagram
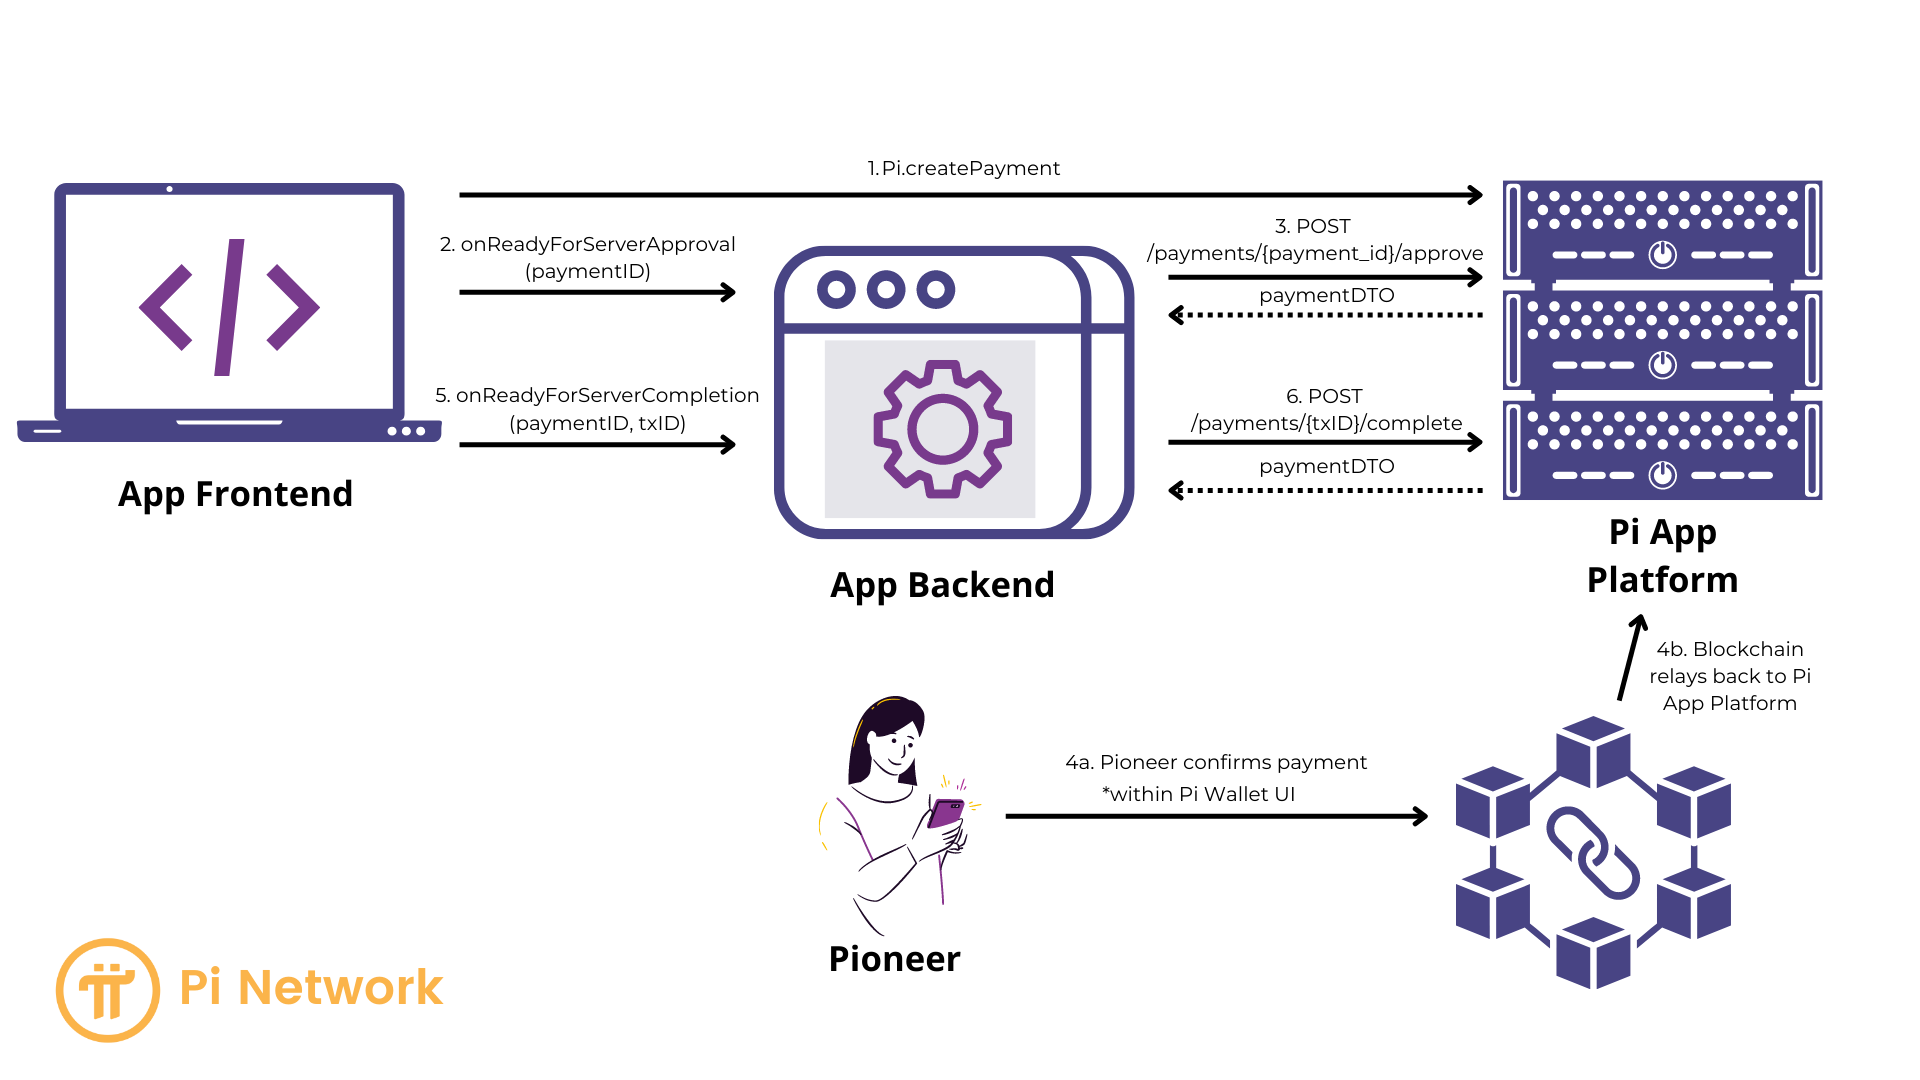
The diagram below outlines the steps involved in a Pioneer to App payment.

Payment Flow Steps
Phase I - Payment creation and Server-Side Approval
- 1. createPayment: Your app's frontend creates the payment. The Payment Flow UI opens, but cannot be interacted with until the payment is approved by your server.
- 2. onReadyForServerApproval: The JS SDK has obtained the payment identifier (PaymentID) and is passing it to your app for Server-Side approval.
- Your app's frontend sends the PaymentID to your app's server. This implementation is your responsibility.
- 3. Server-Side Approval: Your app's server approves the payment with Pi Servers through the /approve API call. This enables the Pioneer to submit the blockchain transaction (as explained in Phase II below).
Phase II - Pioneer interaction and blockchain transaction
Steps 4a and 4b on the Pi Payment Flow Diagram.
At this stage, the payment dialog becomes interactive and enables the Pioneer to (4a) confirm the transaction, sign it, and submit it to the Pi blockchain and (4b) the blockchain completes the transaction and returns the transaction information to the Pi App Platform.
You do not have anything to do at this stage; everything is handled by the Pi Apps Platform and the Pi Wallet.
After the blockchain transaction is submitted, the payment flow will not close. You need to acknowledge the payment through Server-Side completion before your app is visible to the Pioneer again (as explained in Phase III below).
Phase III - Server-Side Completion
- 5. onReadyForServerCompletion: The Pi Servers will submit the Pioneer-approved transaction to the Blockchain. Then the Pi SDK passes the blockchain transaction identifier (TxID) to your app's frontend through the callback function onReadyForServerCompletion. You need this value for the Server-Side Completion flow which uses the TxID in the Pi API call.
- Your app's frontend sends the TxID to your app's server. This implementation is your responsibility.
- 6. Server-Side Completion: Your app's server acknowledges the payment with the Pi Servers through the /complete API endpoint. This enables you to check whether the blockchain transaction has actually happened, and to let the Pi Server know that you're aware of it.
- 7. The payment flow closes. Your app is now visible to the Pioneer again. Your app's server and your app's frontend can exchange data, and update the app interface to show a confirmation screen to the Pioneer.
- This implementation is your responsibility.
App Payment Security
Do not complete any payment within your app until the payment has completed and had a paymentDTO returned from the /complete API endpoint of the Server-Side Completion. A malicious user can run a hacked version of the SDK to pretend they have made a payment without making the actual payment. Therefore, if the API call to /payment/{ transaction_id }/complete returns a non-200 error code, do not mark the payment complete or paid with your app.